
How to Manage LinkedIn Sales Navigator Admin Settings?
3 essential tips for optimizing your LinkedIn Sales Navigator admin. Manage users, customize settings, and boost your team's performance now!


On this page
- 01What are LinkedIn Sales Navigator admin settings?
- 02How to manage users in Sales Navigator?
- 03What is the Sales Navigator admin center?
- 04How to sign in to Sales Navigator?
- 05How to add or remove admins?
- 06What is CRM sync in Sales Navigator?
- 07What are admin privileges in Sales Navigator?
- 08How to access admin reporting?
Feeling lost in the maze of LinkedIn Sales Navigator admin settings? You’re not alone.
The Account Center has been rebranded as the Admin Center your new home base for managing all admin settings in one place.
In this article, you’ll get:
✅ The core admin settings that actually matter
✅ How to stay on top of user management
✅ A guided tour of the Sales Navigator Admin Center
Ready to take control of your Sales Navigator setup? Let’s dive in.
What are LinkedIn Sales Navigator admin settings?
Think of admin settings as your mission control.
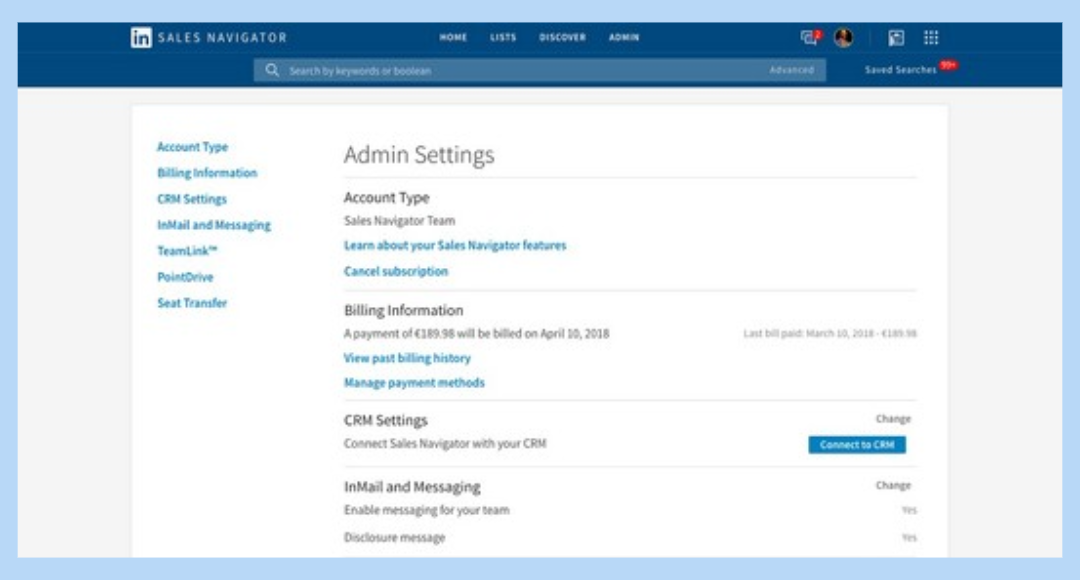
This is where you manage the Sales Navigator experience for your entire team from who gets access to how the platform syncs with your CRM. It's the difference between reactive and strategic.
Here’s what you can control:
🔐 User access management
👥 Customizing team links and tags
🔗 Setting up CRM sync
Pro Tip: Regularly review your admin settings to ensure your team has the right access and tools they need.
How to manage users in Sales Navigator?
Team alignment starts here.
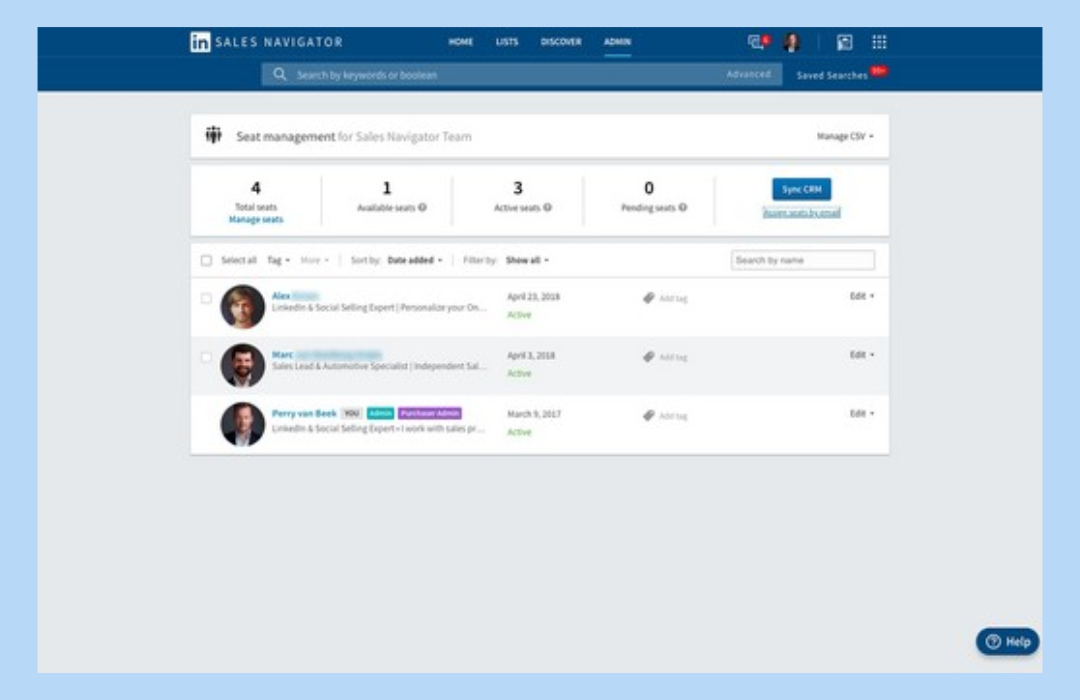
That’s your dashboard for adding new teammates, removing old ones, assigning licenses, and checking who's actually using the tool.
Steps to manage users:
1️⃣ Go to the Admin center on yourLinkedIn account
2️⃣ Click on the Seat Transfert tab
3️⃣ Use the seat management dashboard to add or remove users
Quick Tip: Use the CSV upload feature to add multiple users at once for efficiency.
What is the Sales Navigator admin center?
This is your command center.
The Sales Navigator Admin Center pulls everything together team activity, analytics, settings, and integrations. It’s where strategy meets execution.
Here’s what you’ll find:
👥 Team management
📊 Data analytics
🔗 Integration settings
Pro Tip: Leverage the insights from the Admin Center to make data-driven decisions for your team.
How to sign in to Sales Navigator?
Logging in? Simple.
Just use your regular LinkedIn credentials and you’re in. If you’re an admin, you’ll automatically get access to all the backend tools.
Steps to sign in:
1️⃣ Go to LinkedIn.com
2️⃣ Enter your LinkedIn username and password.
3️⃣ Click on 'Go to Sales Navigator' or 'Sales Nav' icon to access your account.

Quick Tip: Bookmark the Sales Navigator homepage for easy access whenever you need it.
How to add or remove admins?
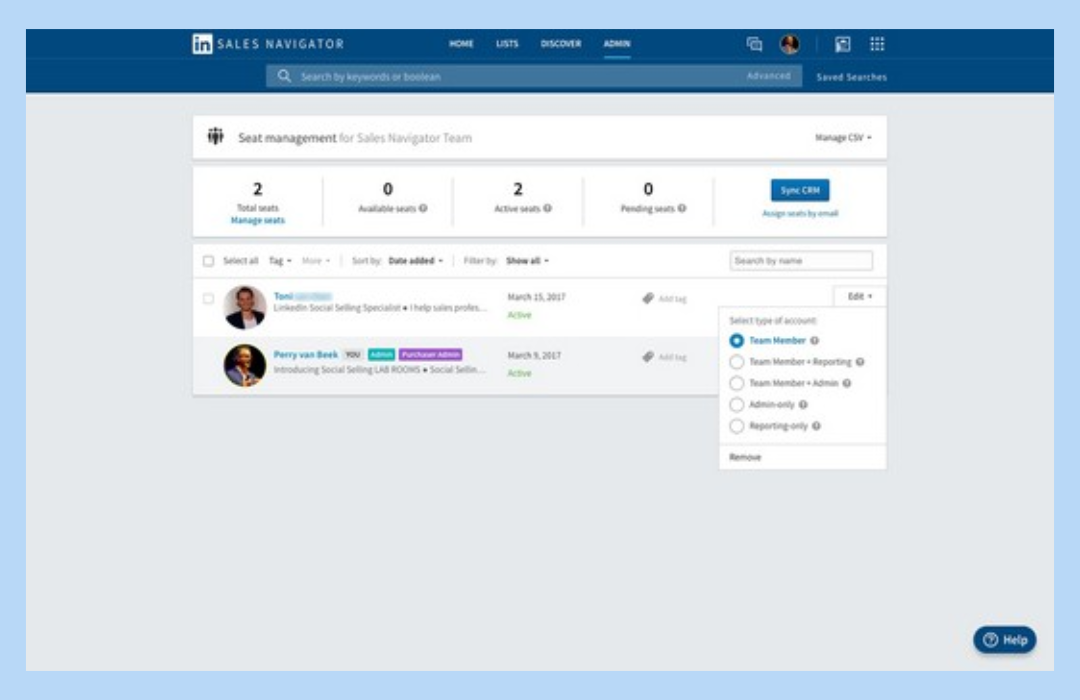
Giving admin rights? Change users permissions easily from the Admin Center.
Here’s how to update roles:
1️⃣ Select the user you want to update.
2️⃣ Click on 'Edit' next to their name.
3️⃣ Adjust their admin status by checking or unchecking the box.
Pro Tip: Admins can make big changes only assign access when it’s really needed.
What is CRM sync in Sales Navigator?
Your CRM is only as good as the data inside it.
That’s where CRM Sync in Sales Navigator comes in.
When enabled, Sales Navigator automatically pushes lead activity and contact info straight into your CRM.
Top benefits:
🤖 Automatic data updates
👤 Contact management
🚀 Streamlined workflows
Quick Tip: Make sure you have the right permissions before setting up the CRM sync.
What are admin privileges in Sales Navigator?
Admins don’t just manage they lead.

From user access to account settings, your admin privileges put you in the driver’s seat keeping the team sharp, efficient, and always in the loop.
Admin privileges include:
👤 Adding or removing users
📊 Overseeing team activity
🔐 Adjusting account settings
Pro Tip: Use your admin powers wisely to enhance your team's productivity.
How to access admin reporting?
Want to know who’s using Sales Navigator and how well?
Admin Reporting shows you everything from activity levels to InMail usage.
Steps to access reports:
1️⃣ Navigate to the Admin section.
2️⃣ Select the Reporting tab.
3️⃣ Customize your view and download reports as needed.
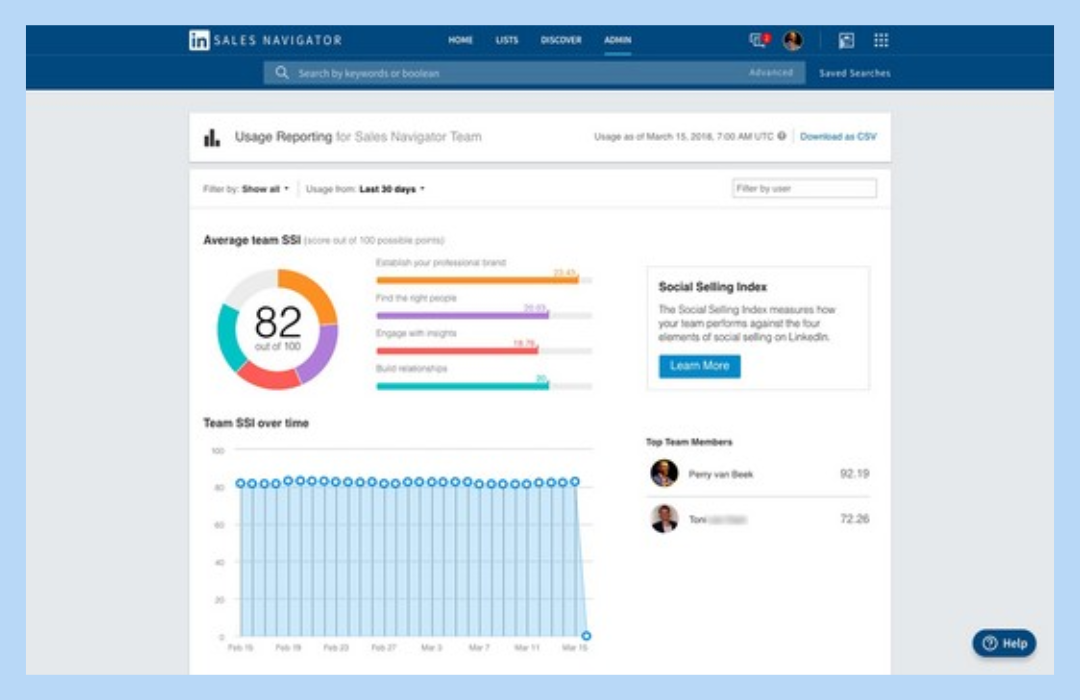
Quick Tip: Regular reporting helps identify areas where your team can improve.
Still have questions? Check out Sales Navigator scraper free for additional resources.
Also, learn how to change signatures in Sales Navigator or explore LinkedIn Sales Navigator analytics for deeper insights.
If you need to make changes to your subscription, here's how to cancel LinkedIn Sales Navigator.
At Pipecorn, we're all about making life easier for sales professionals. We hope this guide helps you navigate the Sales Navigator admin center like a pro.
Remember, keeping your account well-managed ensures your team stays on top of their game.